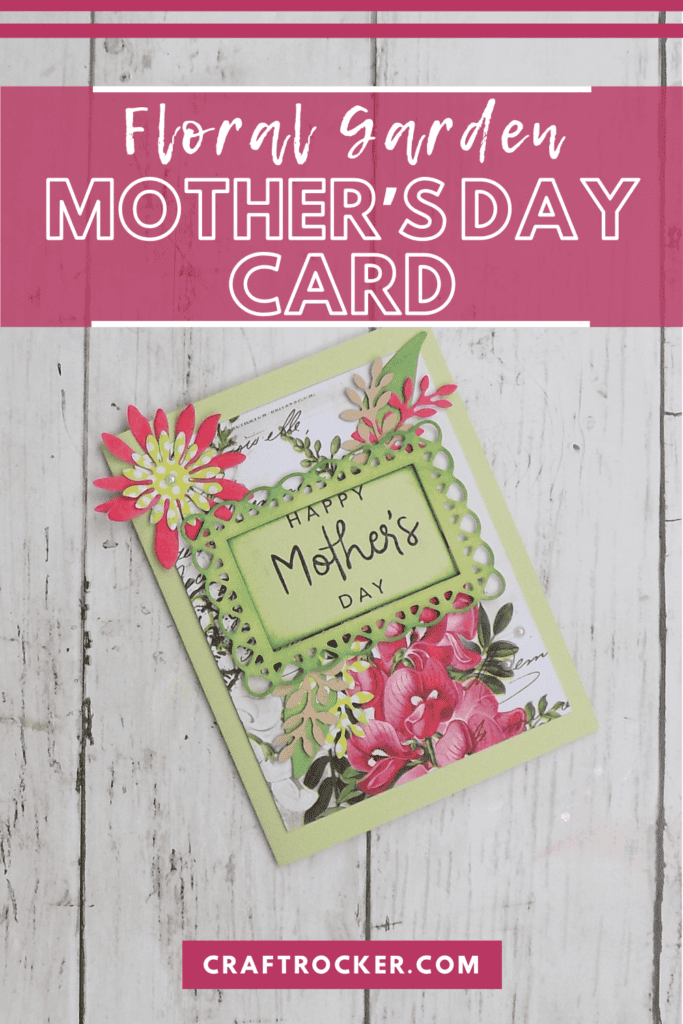
This floral garden Mother’s Day card looks fancy but is totally easy to make!
Affiliate links may be used in this post. Ordering a product through these links may result in a commission at no extra cost to you. Read the full disclosure here.

Jump to What You Want
Floral Garden Mother’s Day Card Materials
Floral Garden Mother’s Day Card How-To
Printable Floral Garden Mother’s Day Card Tutorial
Have you ever fallen in love with a piece of ephemera and known you just had to make something with it?
That is exactly what happened with this gorgeous floral cardstock piece.

As soon as I saw it, I simply had to use it. This entire Mother’s Day card was designed around this one element and turned out stunning, I think.
Floral Garden Mother’s Day Card Materials

Stamps Used
- Stampin’ Up Heartfelt Hellos
- Scrapbook.com Sweet Expressions

Paper Used
- Pale Green Cardstock
- White Cardstock
- Scrap Paper in Tan, Green, and Red colors that Coordinate with the floral ephemera used
Ink Used
- Light Green Ink
- Dark Green Ink
- Black Ink
Adhesives Used
- Glue Runner
- Adhesive Foam Squares (small)
- Liquid Glue

Paper Cutting Dies Used
- Art Impressions Journal Rectangle Frames
- Sunflower Elements
Embellishments Used
- 49 and Market Gardenia Ephemera Bits
- Small Pearl Gems
Tools Used
- Scoreboard
- Paper Cutter
- Sizzix Big Shot
- Acrylic Block

Step 1 – Make Your Card Base
Start with a 8.5×11 inch piece of pale green cardstock placed on a scoring board with the 11 inch edge at the top.
Next, score it at 5.5 inches and use a paper cutter to cut the sheet apart along the scored line.
After your cardstock is cut, set aside one half and place the other half back on your scoreboard, this time with the 8.5 inch side at the top. Then score it at 4.25 inches.
Finally, fold your card along the score line. Run over the crease with either your scoring tool or bone folder to get a strong crease.

Step 2 – Mat Floral Ephemera
Once your card base it made, take your floral cardstock piece from the set and trim 1/4 inch off of the bottom.

Next, use your glue runner to mat the larger piece of trimmed ephemera to the center of your card front (portrait orientation).

Step 3 – Cut and Stamp Decorative Elements of Card Front
Now, grab your second half of pale green cardstock and use the lace rectangle cutting die with your Sizzix Big Shot to cut it out.

Be sure to save the inside rectangle because you will use that, too.
Next, chalk the edges of your lace frame with light green ink. Ensure that you ink all the way to the inner edge of the rectangle.

Then go back over your lace frame and chalk only the outer edges with dark green ink.

Grab your inner paper rectangle and chalk the edges of it with dark green ink as well.

After the edges are chalked, stamp “Happy Mother’s Day” in black ink centered on the inner rectangle.

Lastly, cut out your flowers and leaves from scrap cardstock. You need at least six (6) leaves, one (1) large flower, and one (1) small flower.

Step 4 – Attach Mother’s Day Sentiment and Frame

Start by attaching the “Happy Mother’s Day” rectangle to your card front with your glue runner.
Ensure that it is centered in the top third of your card front. See the picture above for reference.

Next, cut about five (5) small adhesive foam squares and attach them to the back, along the inside edge, of your lace rectangle.

Lastly, attach the lace rectangle to the card front so that it is centered over the Mother’s Day sentiment.

Step 5 – Glue on Embellishments
First, glue three (3) of your leaves at the tip right of your lace frame so that the stems are tucked behind the frame. Be sure to fan them out slightly so that you can see each of them.
Next, repeat with three (3) more leaves on the bottom left of your lace frame.
Then, glue your larger flower to the top left corner of your card. Only add glue to the center of the flower, not on the petals.
After your larger flower is attached, glue your small flower directly over the center. Again, don’t glue the petals down.

Finish your card front by attaching pearl embellishments. I added one (1) to the center of the flower and two (2) more on the bottom right of the card front.

Step 6 – Create the Inside of Your Card

Start by cutting out a rectangle of white cardstock that is roughly 2.5 inches by 3.5 inches.

Next, arrange “love”, “you”, and “forever” stamps on your acrylic block. Then stamp in black ink centered on the white cardstock rectangle.

Finally, attach the rectangle with a glue runner to the inside right flap of your card.
Tips and Tricks
- You might have noticed that my “Happy Mother’s Day” sentiment isn’t perfectly centered on the small rectangle. I still think the card turned out beautifully so don’t worry if you smudge up a little bit when stamping. If you are a perfectionist, use a stamping tool to perfectly align your stamp where you want.
- Only apply liquid glue to the stems of your leaves when attaching them to your card front. You want them to have some movement.

Printable Floral Garden Mother’s Day Card Tutorial
Floral Garden Mother's Day Card

This floral garden Mother’s Day card looks fancy but is totally easy to make!
Materials
- Stampin’ Up Heartfelt Hellos
- Scrapbook.com Sweet Expressions
- Pale Green Cardstock
- White Cardstock
- Scrap Paper in Tan, Green, and Red colors that Coordinate with the floral ephemera used
- Light Green Ink
- Dark Green Ink
- Black Ink
- Glue Runner
- Adhesive Foam Squares (small)
- Liquid Glue
- Art Impression Journal Rectangle Frames
- Sunflower Elements
- 49 and Market Gardenia Ephemera Bits
- Small Pearl Gems
Tools
- Scoreboard
- Paper Cutter
- Sizzix Big Shot
- Acrylic Block
Instructions
- Start with a 8.5x11 inch piece of pale green cardstock placed on a scoring board with the 11 inch edge at the top.
- Next, score it at 5.5 inches and use a paper cutter to cut the sheet apart along the scored line.
- After your cardstock is cut, set aside one half and place the other half back on your scoreboard, this time with the 8.5 inch side at the top. Then score it at 4.25 inches.
- Finally, fold your card along the score line. Run over the crease with either your scoring tool or bone folder to get a strong crease.
- Once your card base it made, take your floral cardstock piece from the set and trim 1/4 inch off of the bottom.
- Next, use your glue runner to mat the larger piece of trimmed ephemera to the center of your card front (portrait orientation).
- Now, grab your second half of pale green cardstock and use the lace rectangle cutting die with your Sizzix Big Shot to cut it out.
- Be sure to save the inside rectangle because you will use that, too.
- Next, chalk the edges of your lace frame with light green ink. Ensure that you ink all the way to the inner edge of the rectangle.
- Then go back over your lace frame and chalk only the outer edges with dark green ink.
- Grab your inner paper rectangle and chalk the edges of it with dark green ink as well.
- After the edges are chalked, stamp “Happy Mother’s Day” in black ink centered on the inner rectangle.
- Lastly, cut out your flowers and leaves from scrap cardstock. You need at least six (6) leaves, one (1) large flower, and one (1) small flower.
- Start by attaching the “Happy Mother’s Day” rectangle to your card front with your glue runner.
- Ensure that it is centered in the top third of your card front. See the picture above for reference.
- Next, cut about five (5) small adhesive foam squares and attach them to the back, along the inside edge, of your lace rectangle.
- Lastly, attach the lace rectangle to the card front so that it is centered over the Mother’s Day sentiment.
- First, glue three (3) of your leaves at the tip right of your lace frame so that the stems are tucked behind the frame. Be sure to fan them out slightly so that you can see each of them.
- Next, repeat with three (3) more leaves on the bottom left of your lace frame.
- Then, glue your larger flower to the top left corner of your card. Only add glue to the center of the flower, not on the petals.
- After your larger flower is attached, glue your small flower directly over the center. Again, don’t glue the petals down.
- Finish your card front by attaching pearl embellishments. I added one (1) to the center of the flower and two (2) more on the bottom right of the card front.
- Start by cutting out a rectangle of white cardstock that is roughly 2.5 inches by 3.5 inches.
- Next, arrange “love”, “you”, and “forever” stamps on your acrylic block. Then stamp in black ink centered on the white cardstock rectangle.
- Finally, attach the rectangle with a glue runner to the inside right flap of your card.
That’s how easy it is to make this floral garden Mother’s Day card. What a beautiful way to tell the mom in your life that you love and appreciate her!
Don’t Forget to Pin It!

Check Out These Other Handmade Mother’s Day Ideas!


Leave a Reply