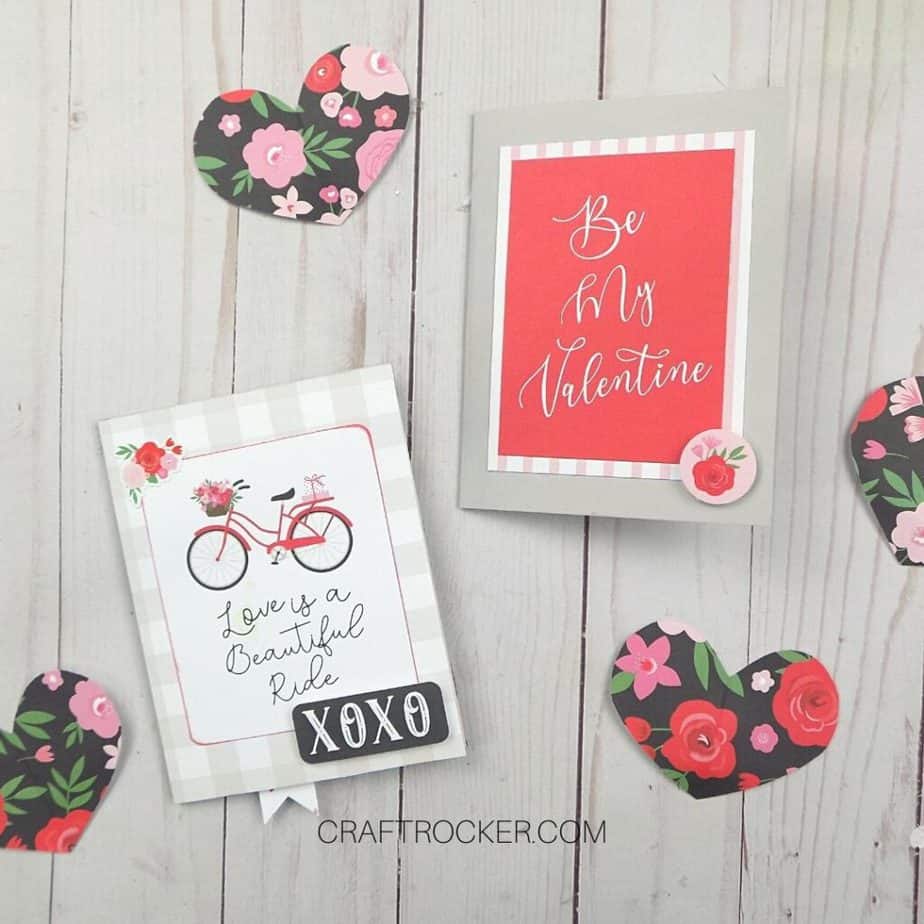
Find out how to make a pop up heart card for Valentine’s Day with these 2 easy tutorials!
Affiliate links may be used in this post. Ordering a product through these links may result in a commission at no extra cost to you. Read the full disclosure here.
Jump to What You Want


Pop up cards are a great way to add some pizazz to a greeting card.
I can’t wait to surprise hubs with one of these cards for Valentine’s Day this year. I could totally use your help though.
Let me know in the comments which one is your favorite before checking out the other awesome paper crafts on Craft Rocker.

How to Make a Pop Up Heart Card 2 Ways
Pop Up Card with Heart
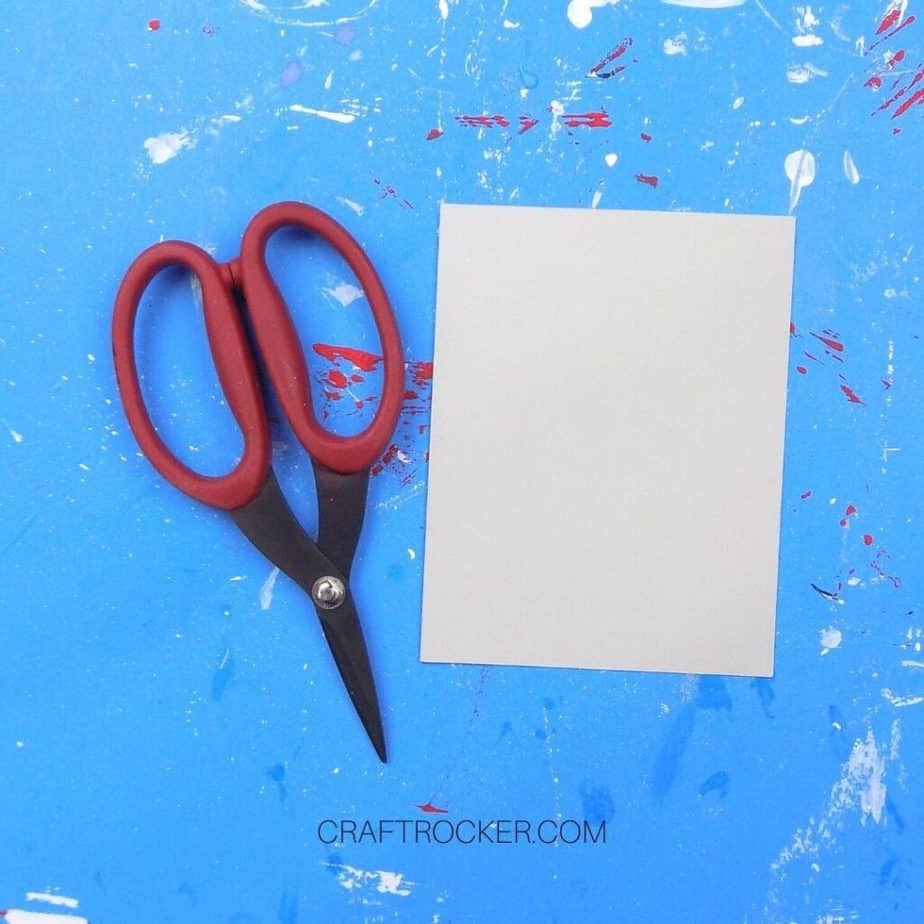
Supplies Needed
Greeting Card Blank
Ruler
Scissors
Red Pigment Ink
Pink Ribbon
Hole Punch (I used the small punch on my Cropadile)
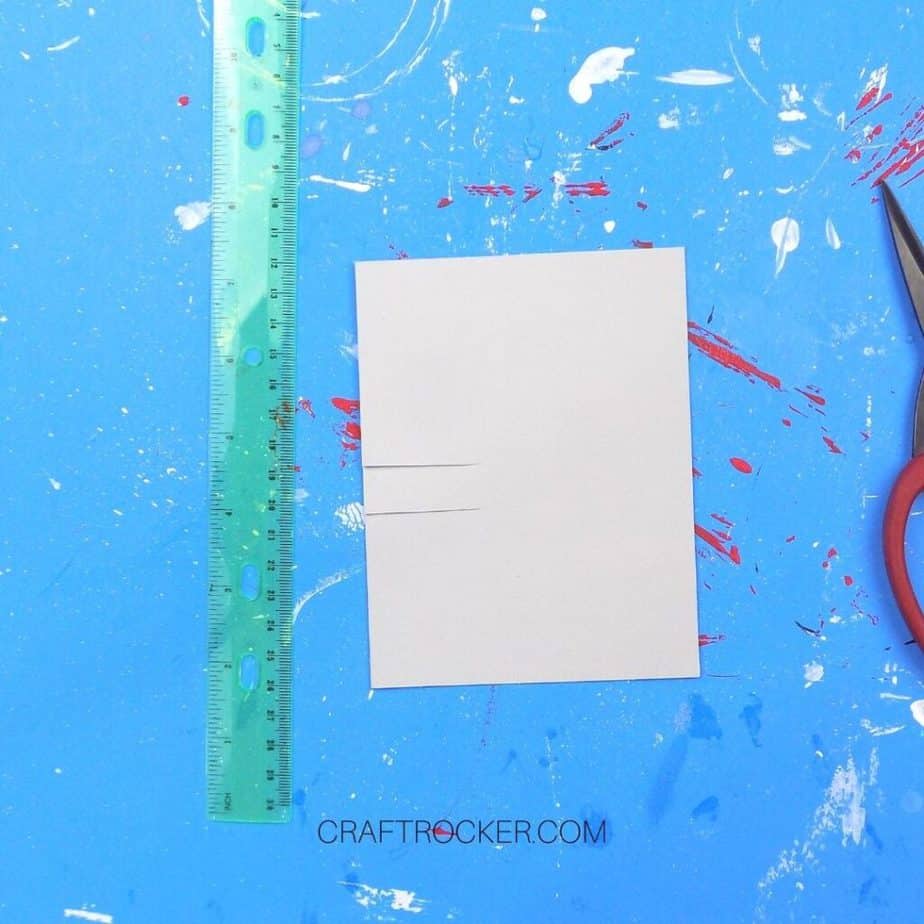
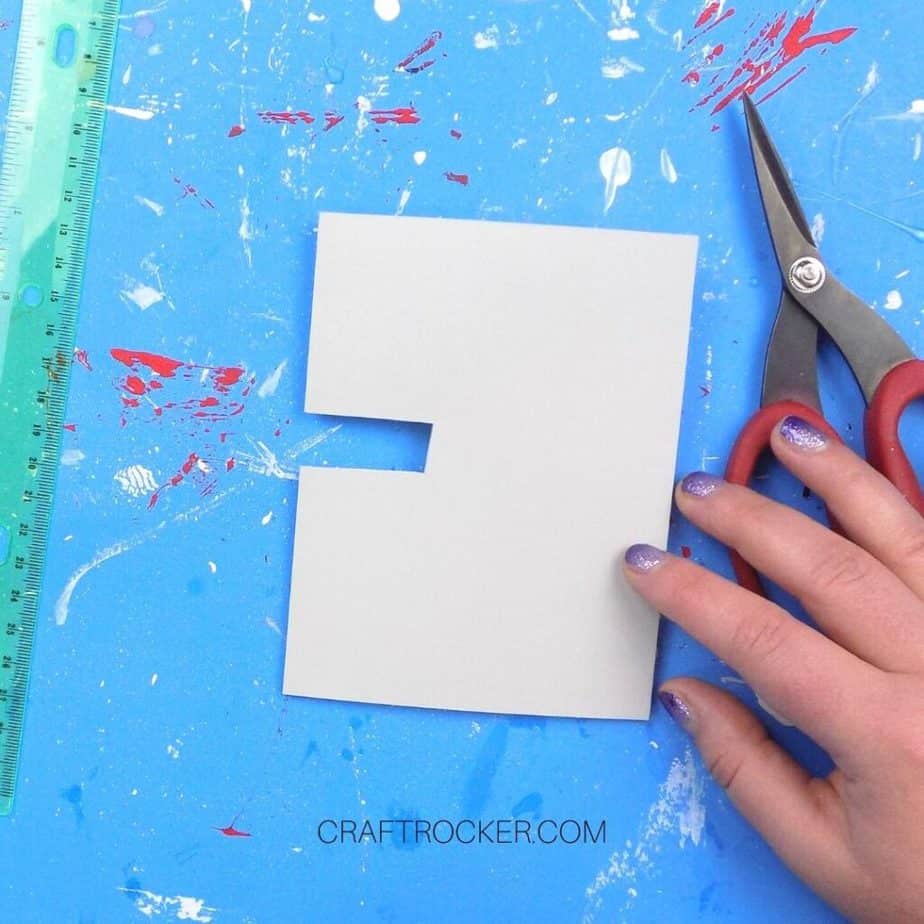
Step 1
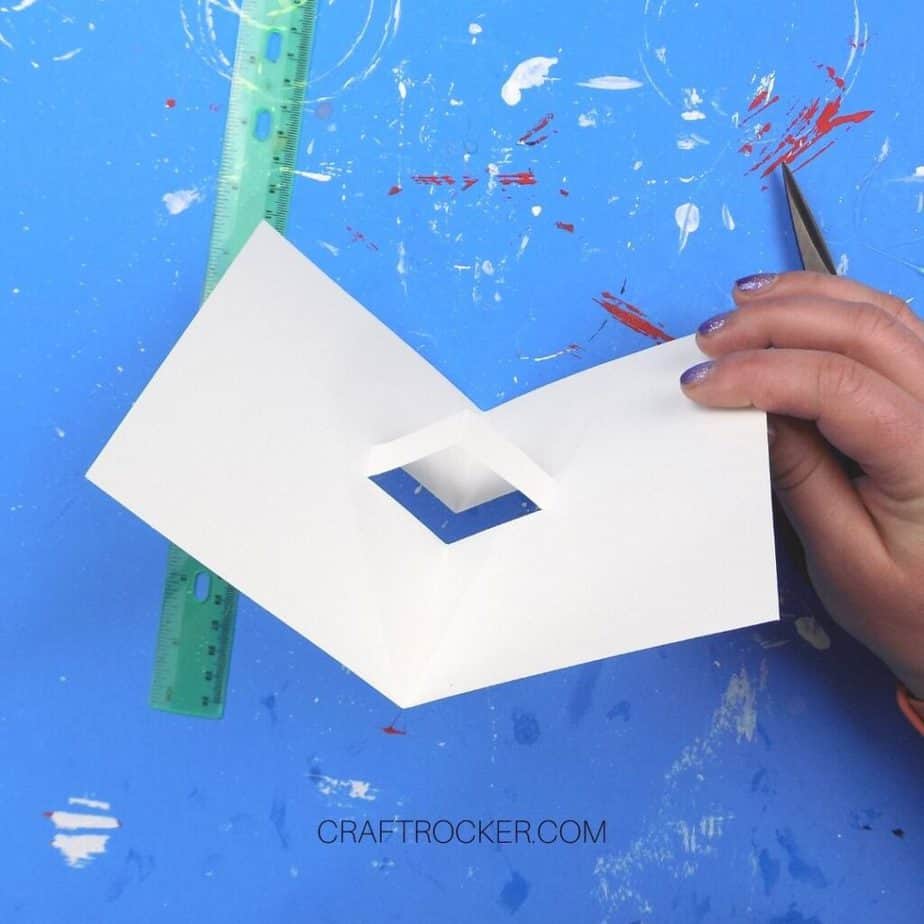
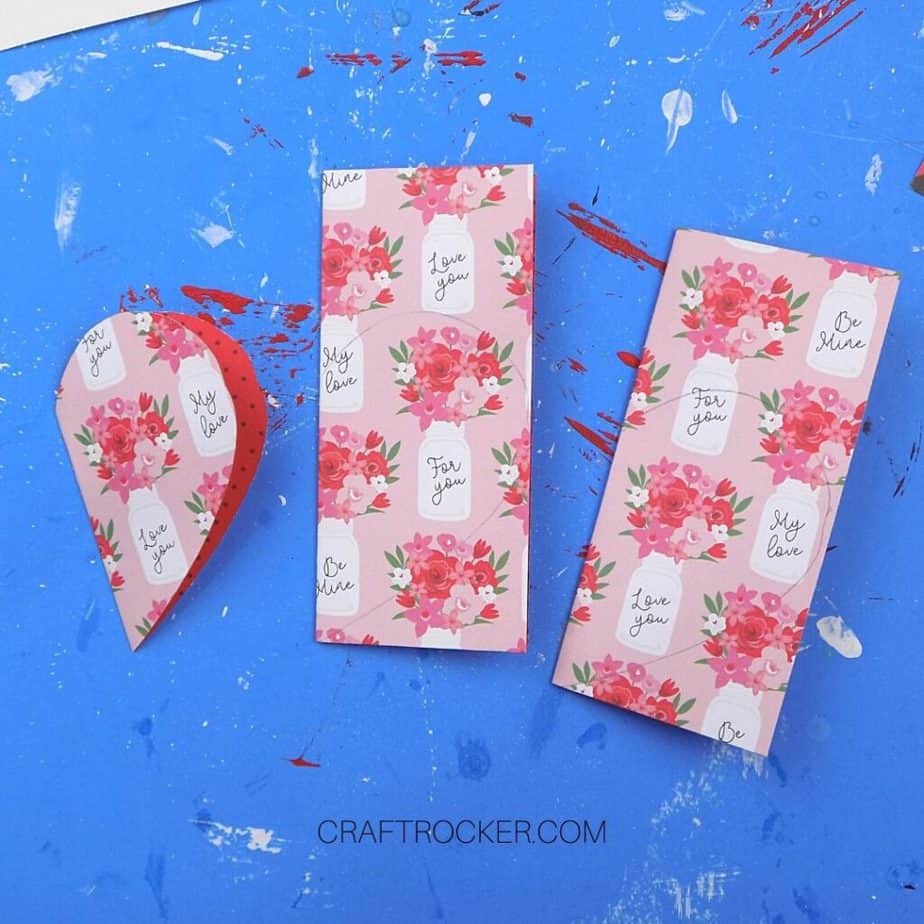
First, cut 2 parallel slits in the middle of the folded edge that are 1/2 an inch apart and 1.5 inches deep. See the picture for reference.
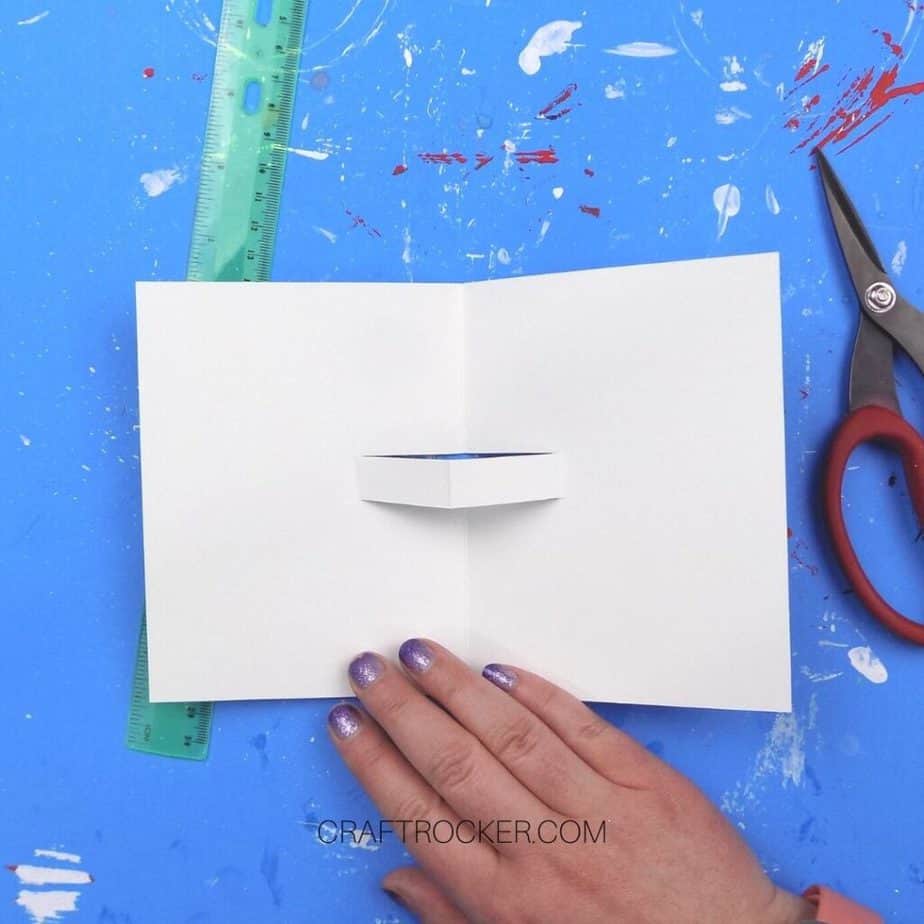
Step 2
Next, open your card and pop the cut section out on the inside and fold the card to create creases in the cut section. This makes it so that the pop out is on the inside of the card.
Step 3
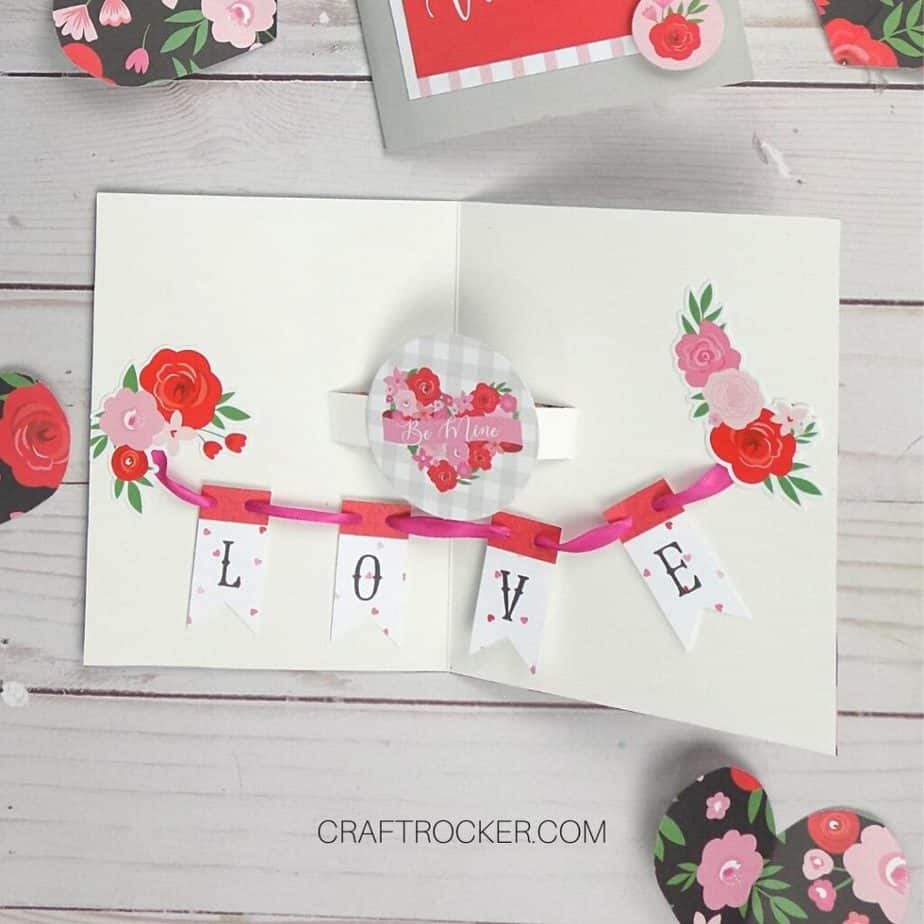
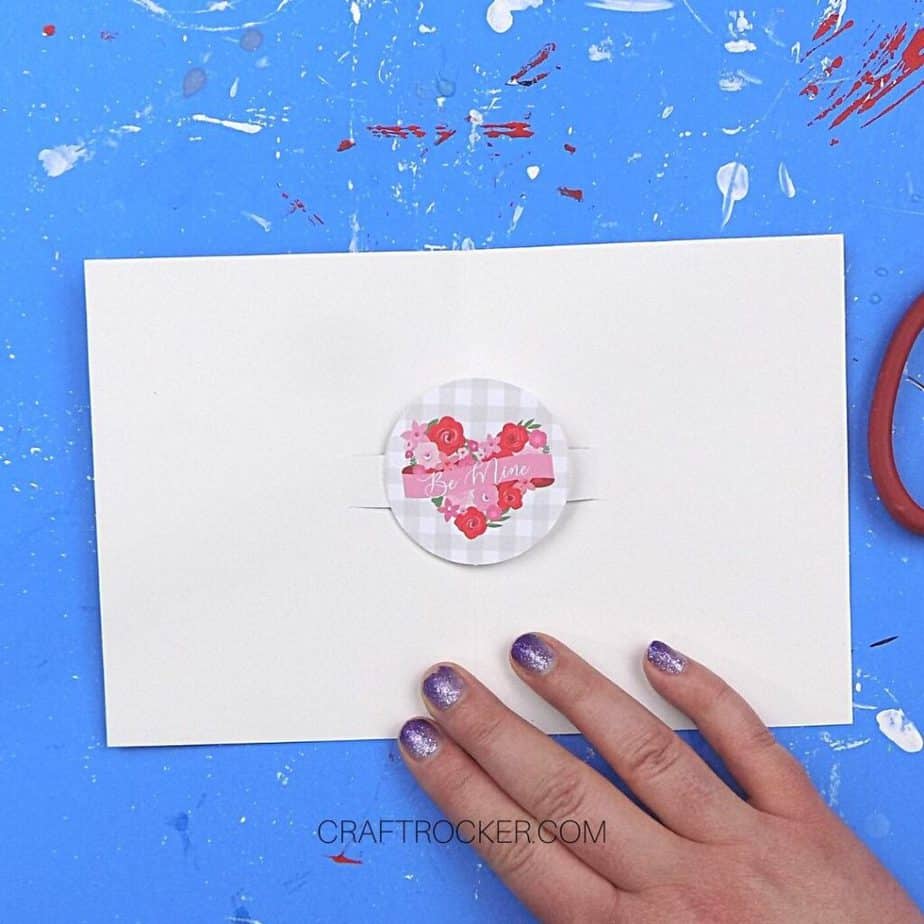
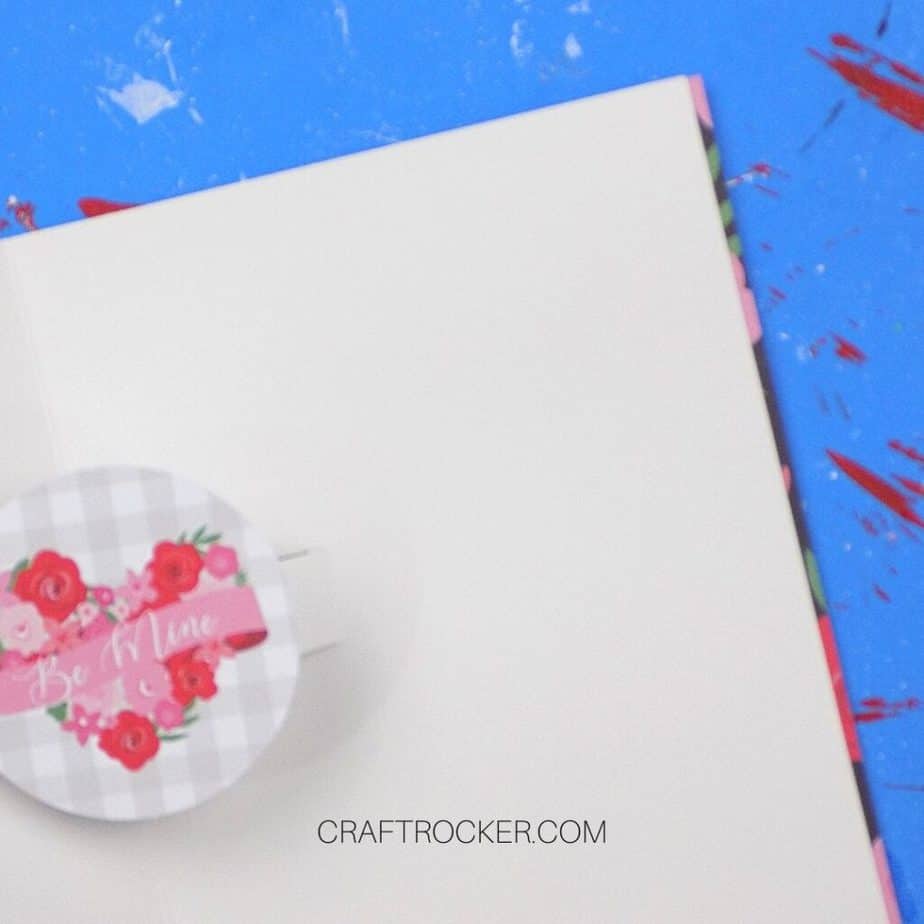
After your pop-up section is ready, pull out the “Be Mine” floral heart element from your embellishments. Add a small strip of glue to the left side of the fold on the pop-up section.
Then press your floral heart element into the glue.
Make sure that the floral heart is centered when the card is open.
Step 4
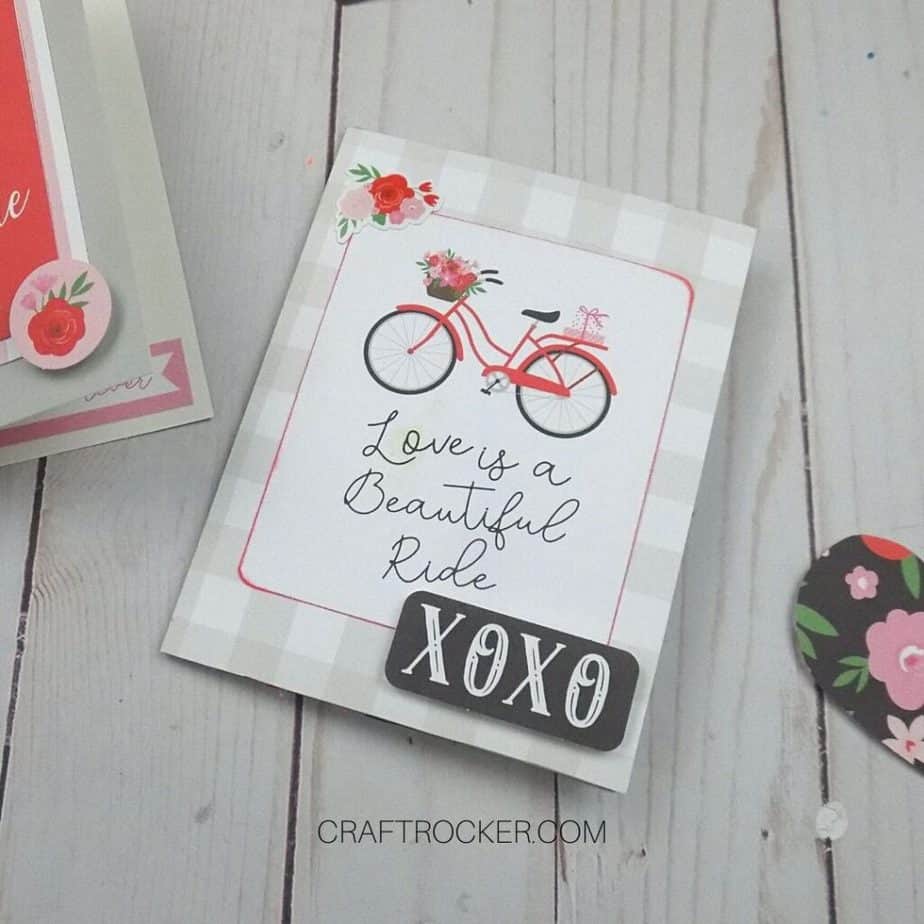
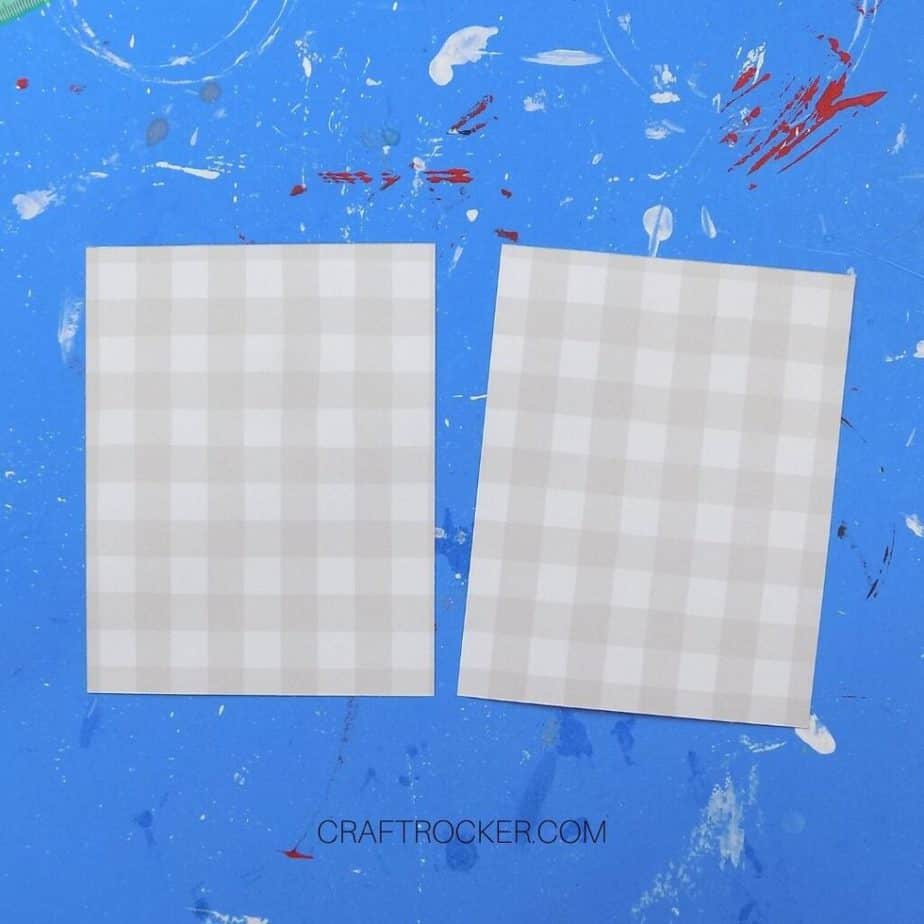
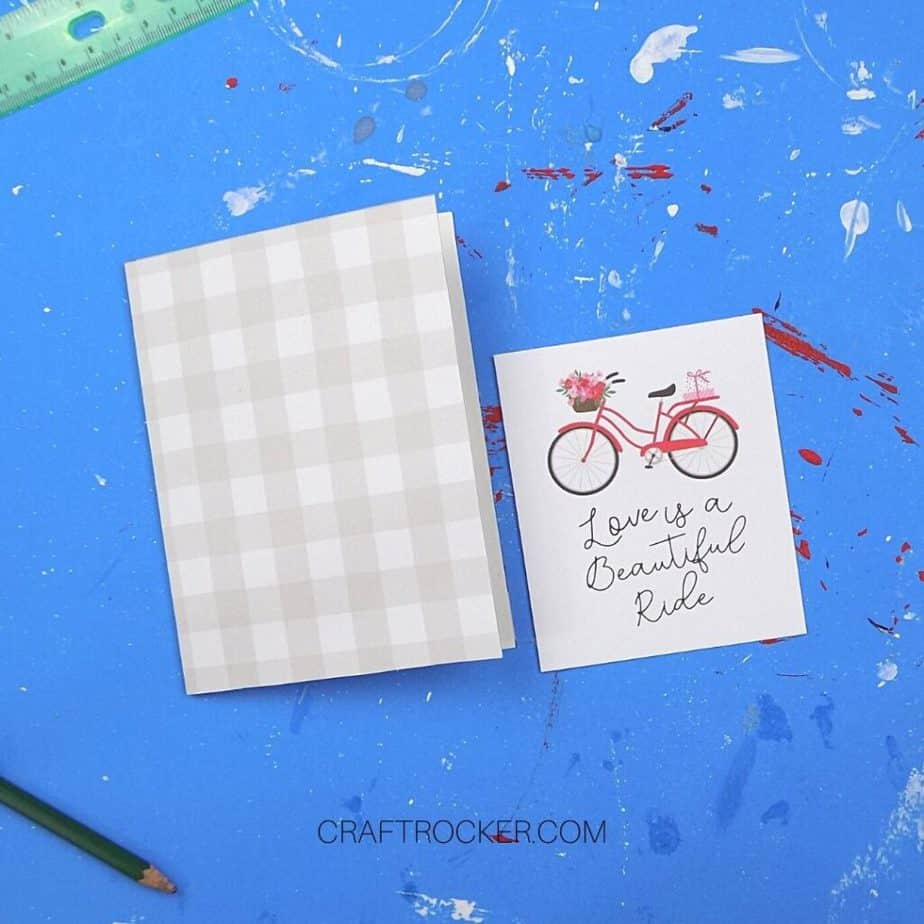
Next, cut out 2 pieces of the gray buffalo plaid paper that are the same height and width of your card front.

Step 5
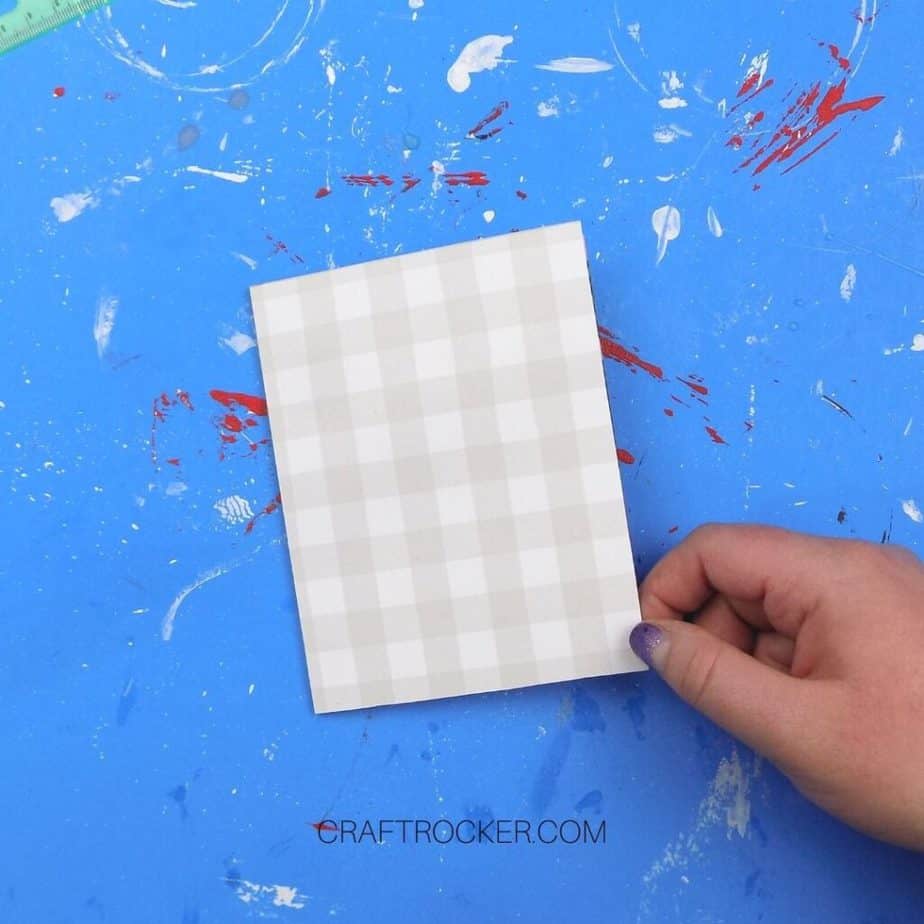
Then use your glue runner to attach one buffalo plaid piece to the front and the back of your greeting card.
Make sure that you start by lining up the edge of the plaid piece with the folded edge of your card.
Step 6
Once your plaid pieces are attached, trim any excess that you can see from the inside of the card.
Step 7
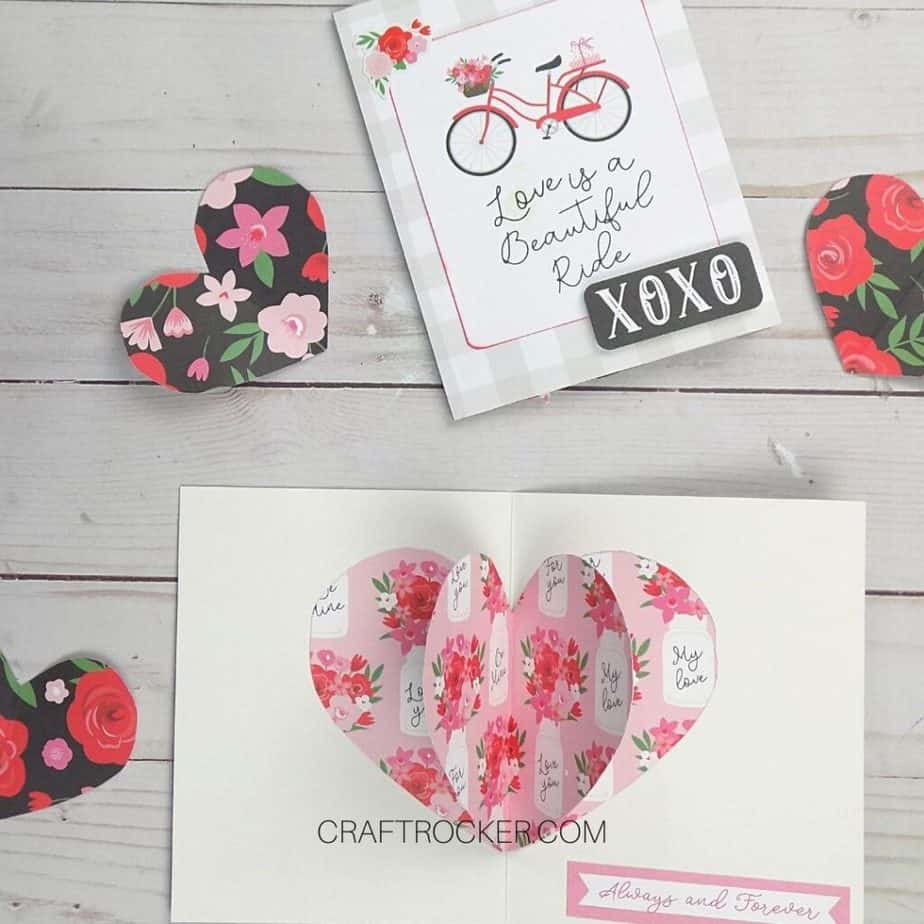
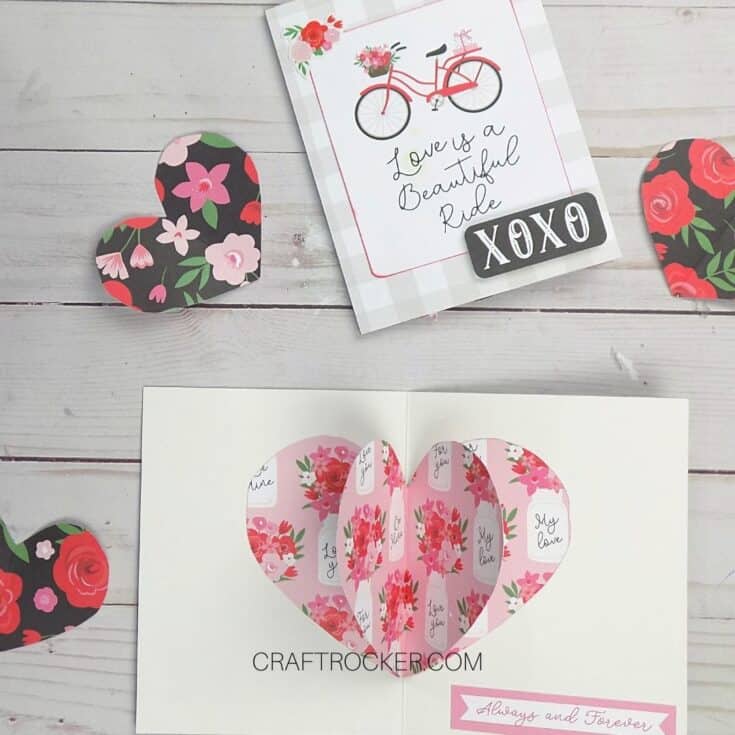
Next pull out the tag sheet from your paper set that has the bicycle on it and says “Love is a Beautiful Ride”.
Cut out that tag from the sheet then trim the long edges roughly 1/4 inch each so that it is smaller than the width of your card.
Step 8
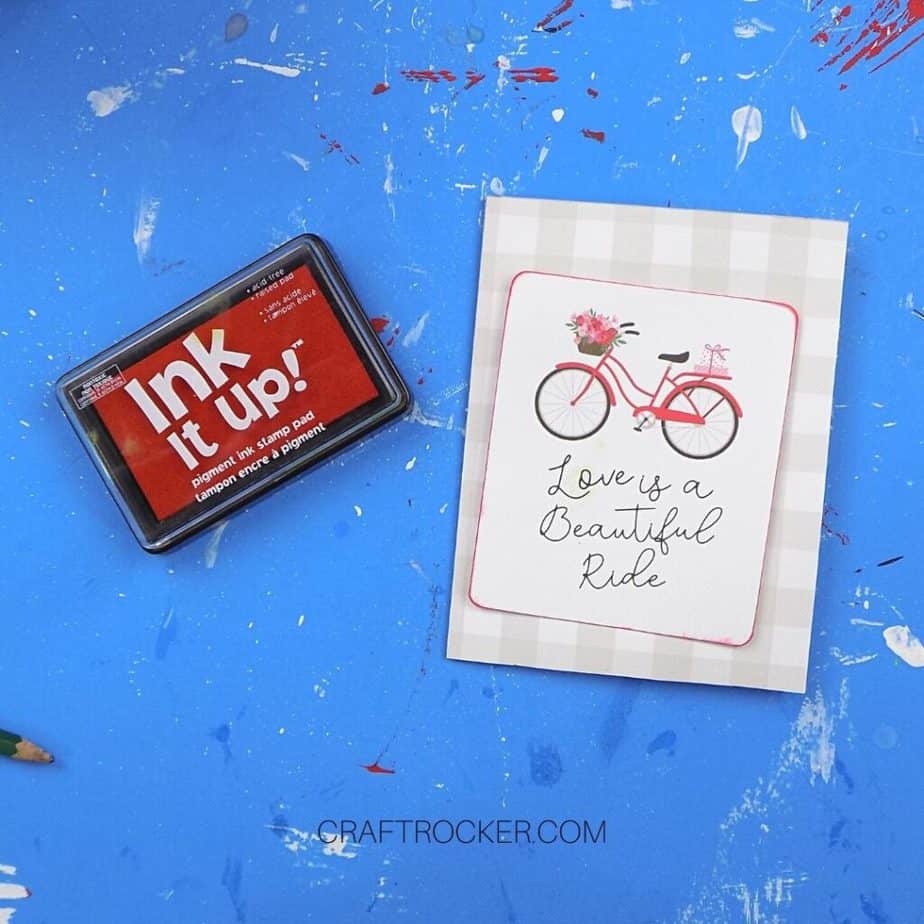
After your tag is cut out and trimmed, round the corners with a corner rounding punch.
Then chalk all around the edges of the tag with red pigment ink.

Step 9
Before attaching your chalked tag, find the “XOXO” embellishment from the Ephemera set.
Then attach your chalked bicycle tag to the center of your card front with your glue runner.
Lastly, attach the “XOXO” embellishment to the bottom, right corner of your card front with your adhesive foam squares.
Step 10
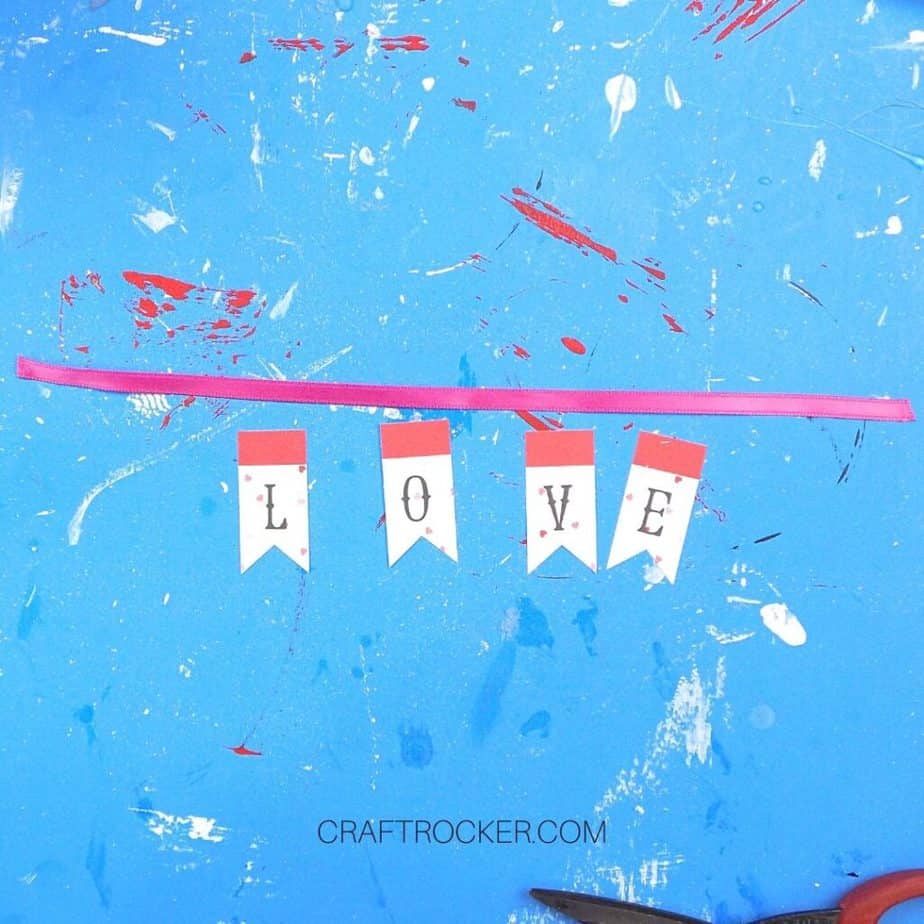
After the front of your card is finished, set it aside and cut a piece of pink ribbon that is roughly 6 inches long.
Then find the L-O-V-E banner pieces from your Ephemera set.
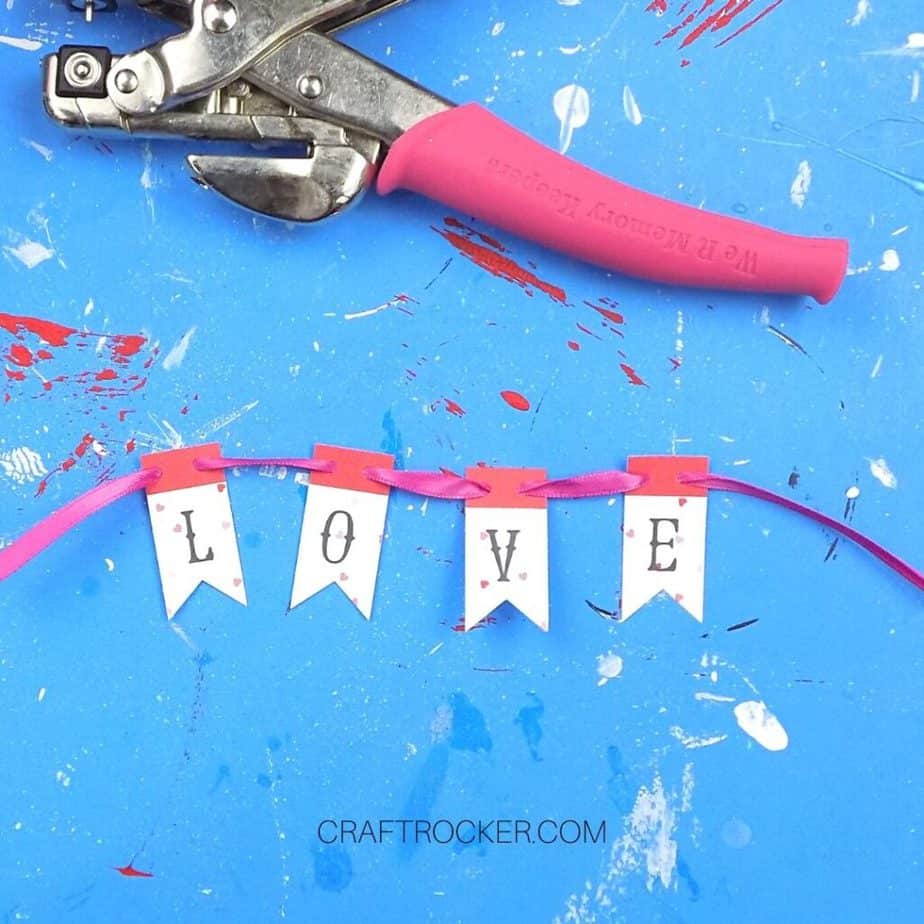
Step 11
Next, punch 2 holes in the top of each banner piece with your hole punch.
Once each piece has 2 holes, thread them onto you piece of ribbon by going in through the front of your banner piece on the first hole and coming up through the back on the second hole.
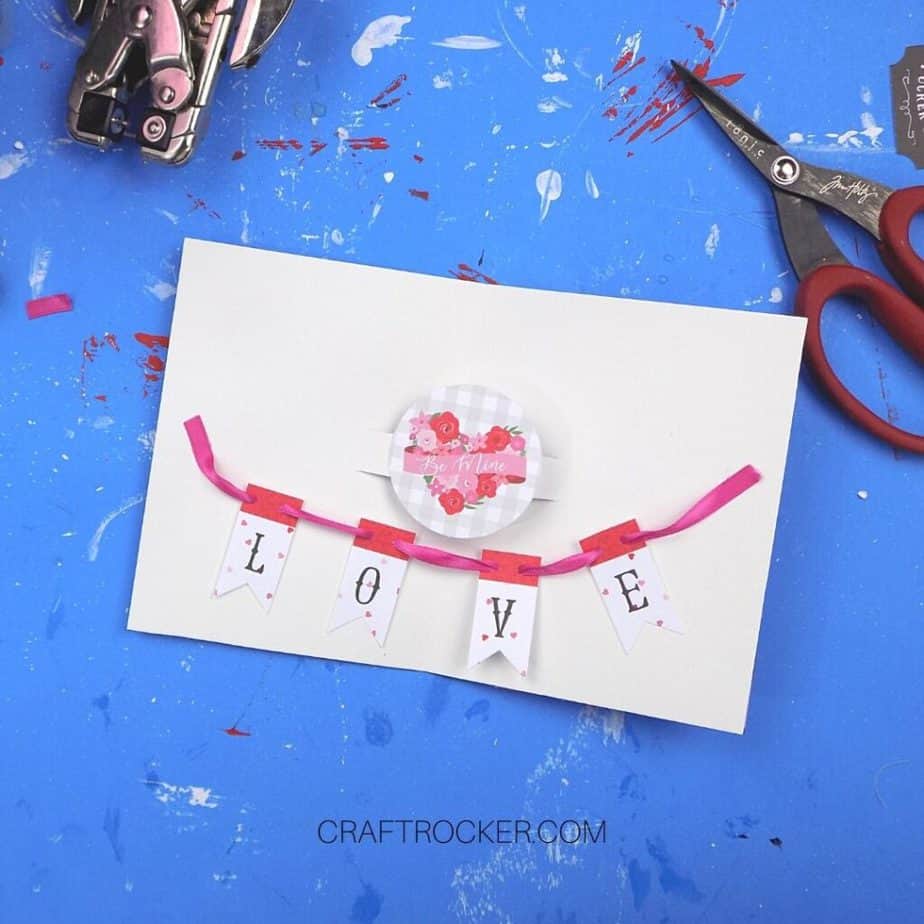
Step 12
Now attach the ends of your ribbon to the inside of your card with a small amount of glue from your glue runner. See the picture above for reference.
Step 13
After your ribbon is attached, trim the excess at the glued ends and then arrange your banner letters so that 2 are on the left of the open card and 2 are on the right.
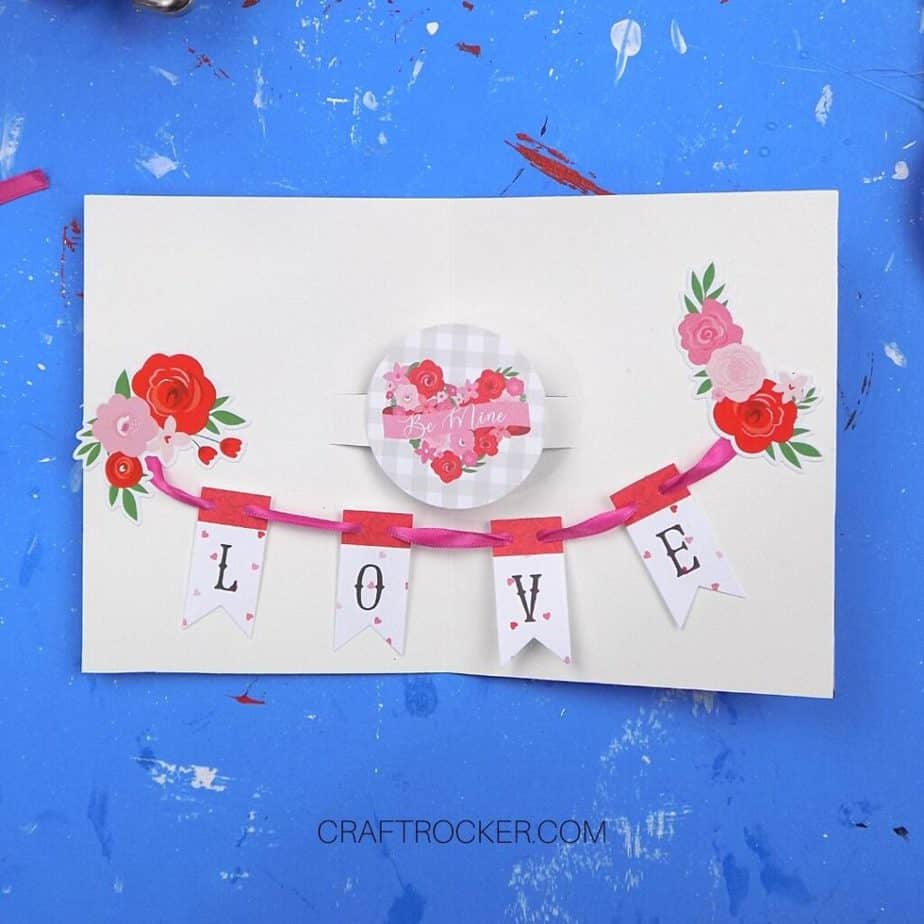
Step 14
Finish your card by attaching a matching floral spray sticker from your paper set over the edge of each ribbon end.
Trim any edges that overhang if necessary.
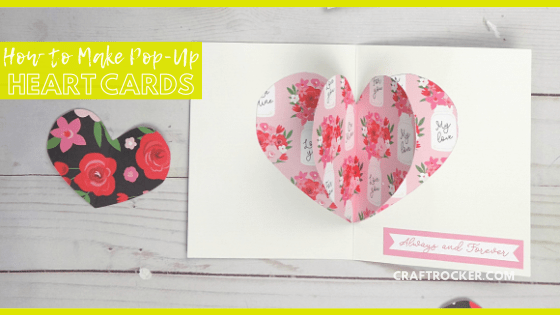
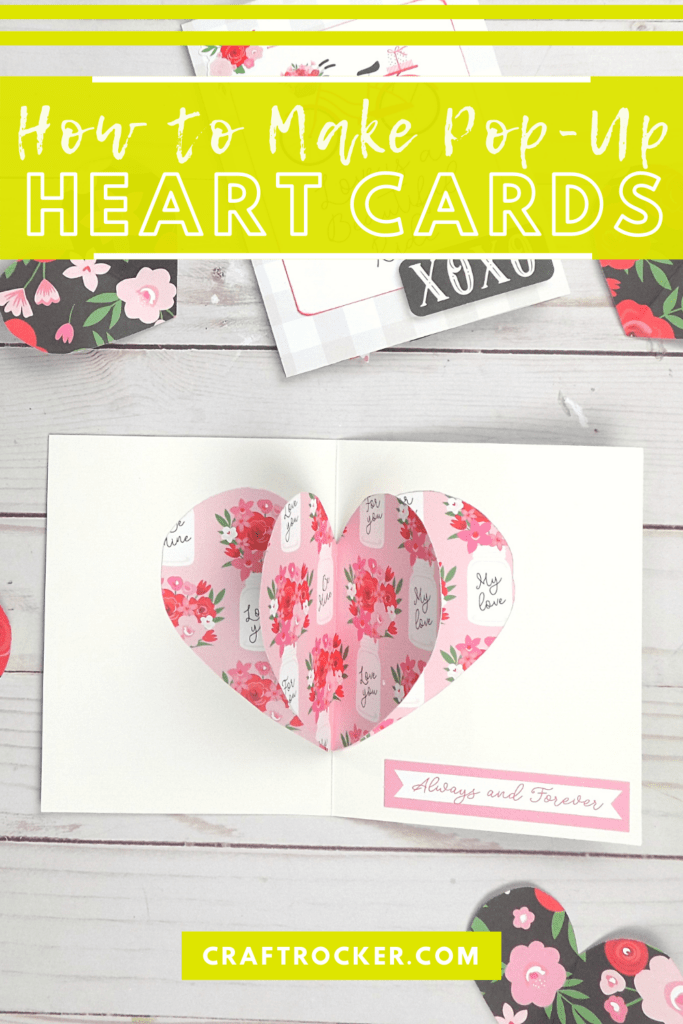
3D Heart Pop Up Card
Supplies Needed
Greeting Card Blank
Ruler
Scissors
Pencil
Step 1
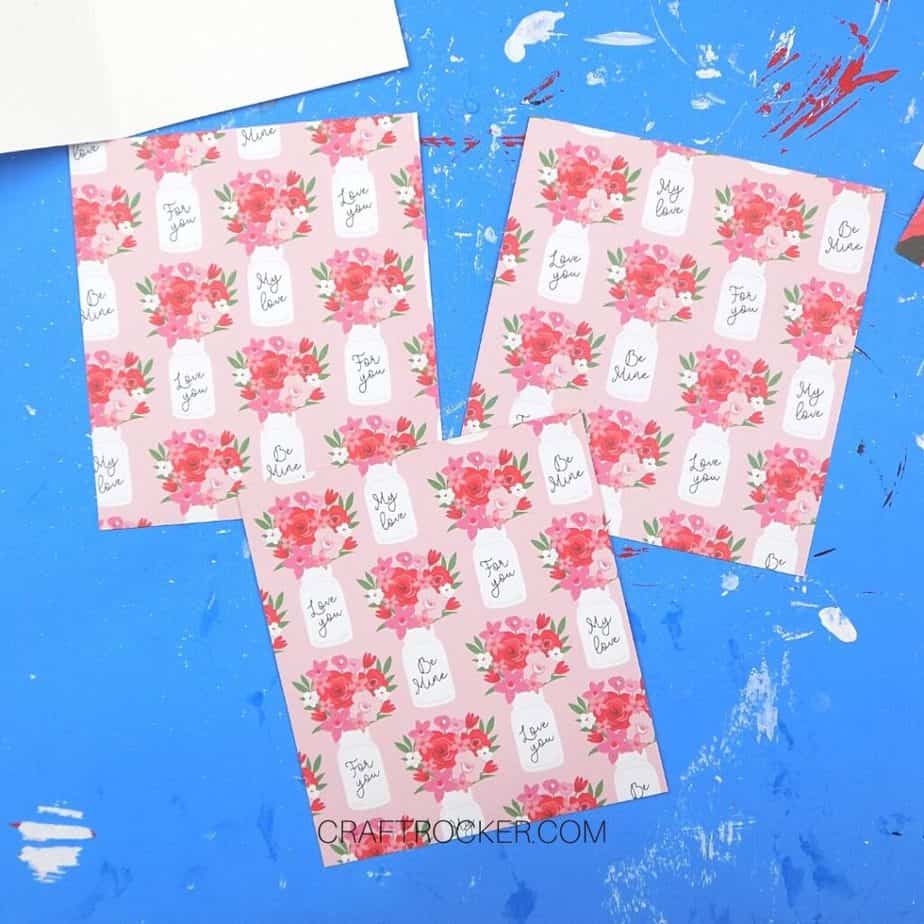
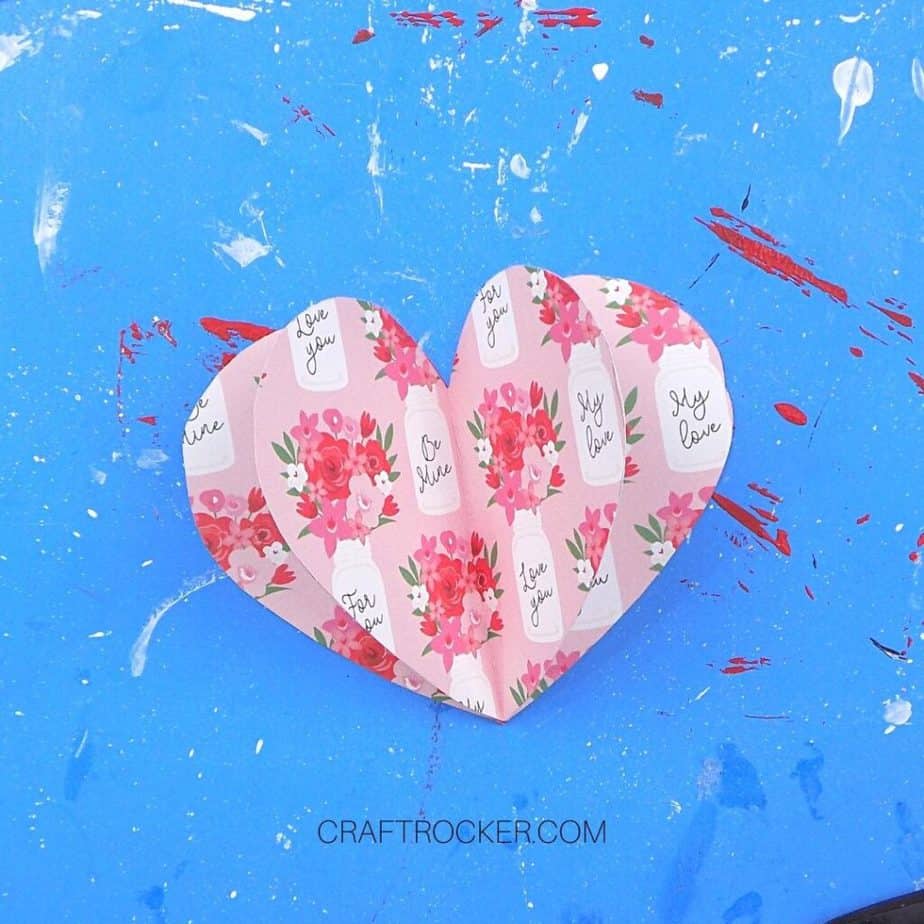
First, cut out 3 squares that are roughly 6 inches from the “Be Mine” jar paper.
Step 2
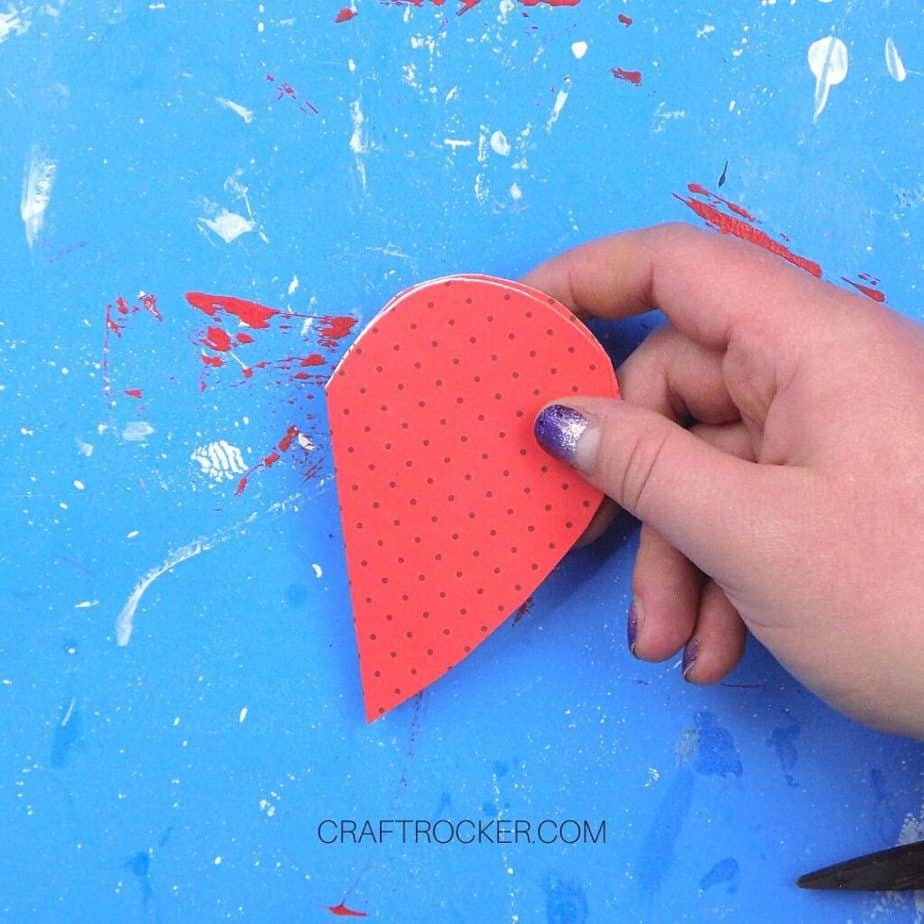
After your squares are cut, fold each square in half. Then cut a heart from one of your squares.
Step 3
Next use the first cut out heart as a template for your remaining 2 hearts.
It’s important that the hearts are the same size for a clean 3D heart.

Step 4
After you have traced your heart onto the second 2 folded papers, cut out each heart.
Step 5
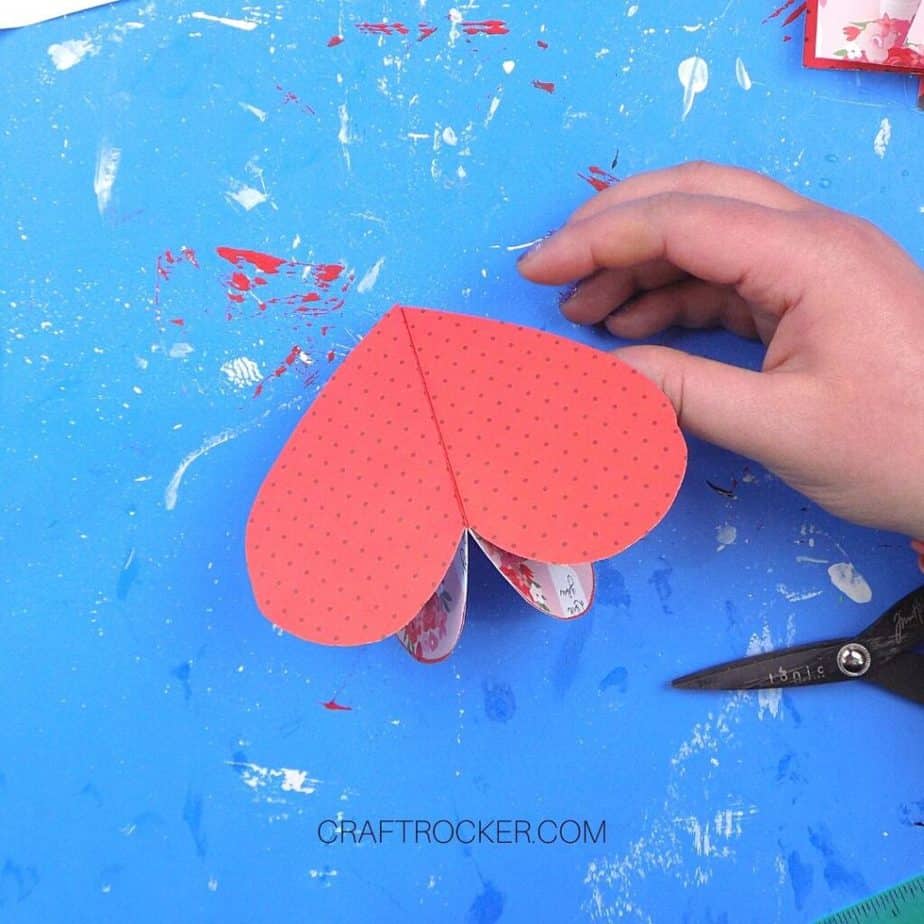
Once all of your hearts are cut out, use your glue runner to attach them together.
To do this, glue the right half of the first heart to the left half of the second heart.
Then glue the right half of the second heart to the left half of the 3rd heart.
Make sure that you attach the polka dotted sides so that the floral sides are what is shown.
Step 6
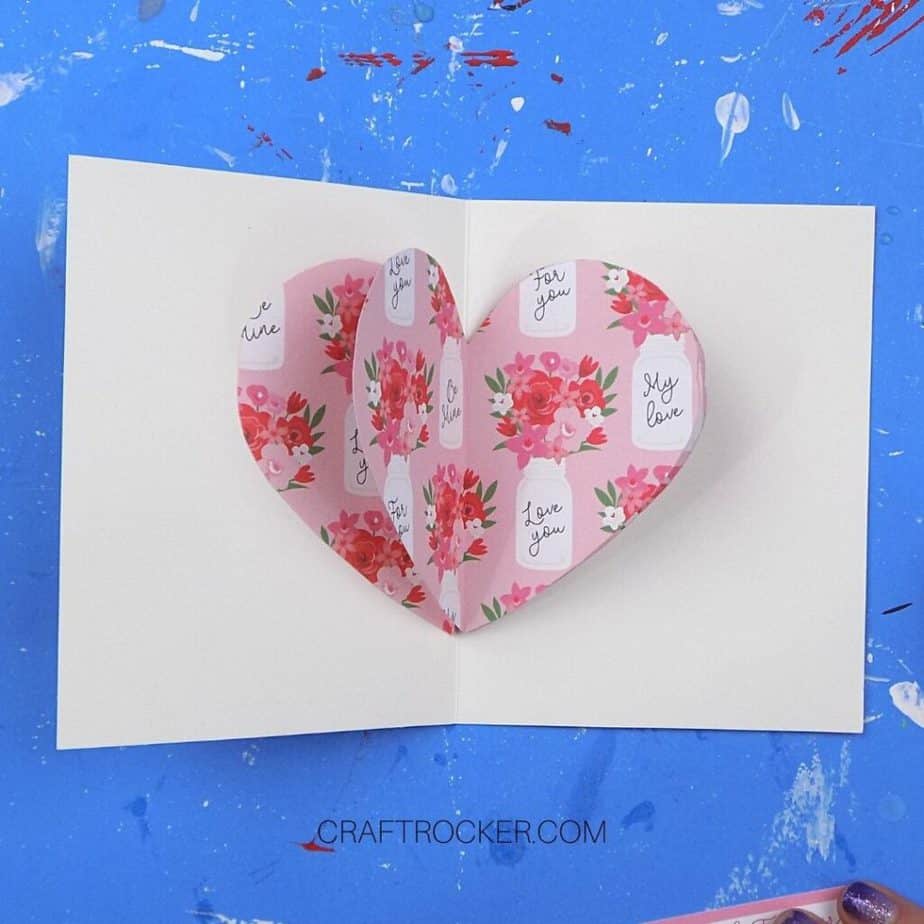
Next, add adhesive from your glue runner to the far right side of your 3D heart and attach it just slightly to the right of the inside center fold of your card.
Step 7
Then add adhesive to the left side of your 3D heart and carefully fold your card and press firmly so that your heart attaches to the inside of the card.
Step 8
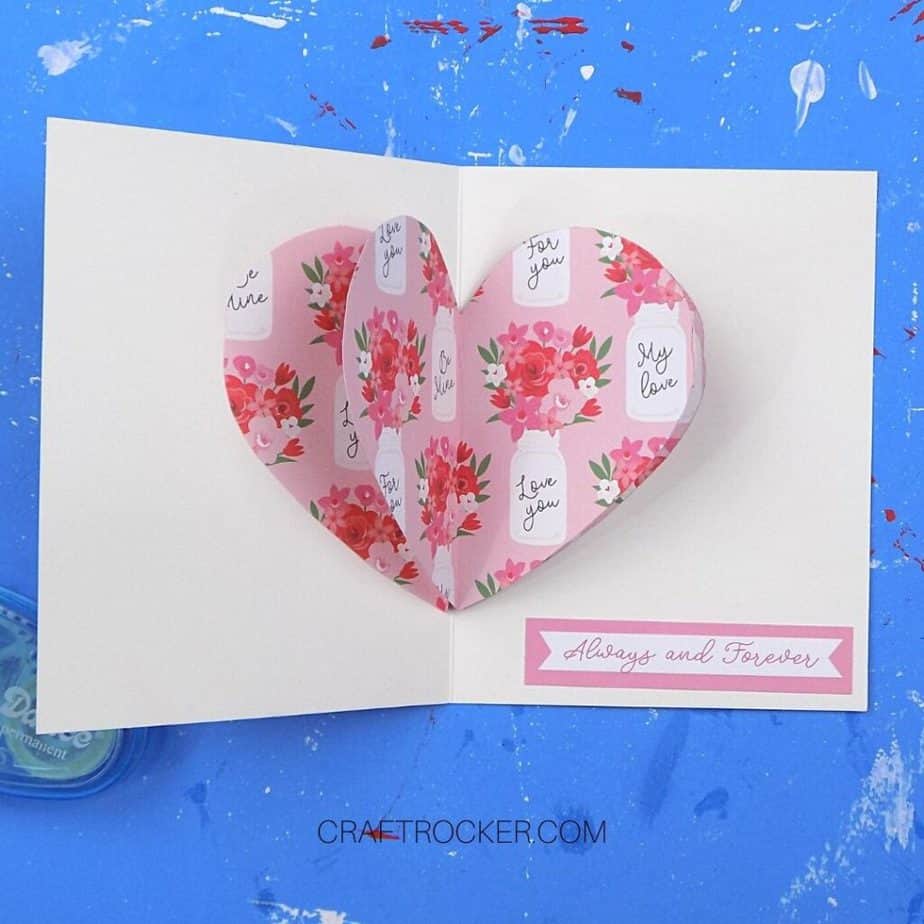
After your 3D heart is attached, open your card again and attach the rectangular “Always & Forever” banner embellishment from the Ephemera pack to the bottom right hand side of the inside of your card.
Step 9
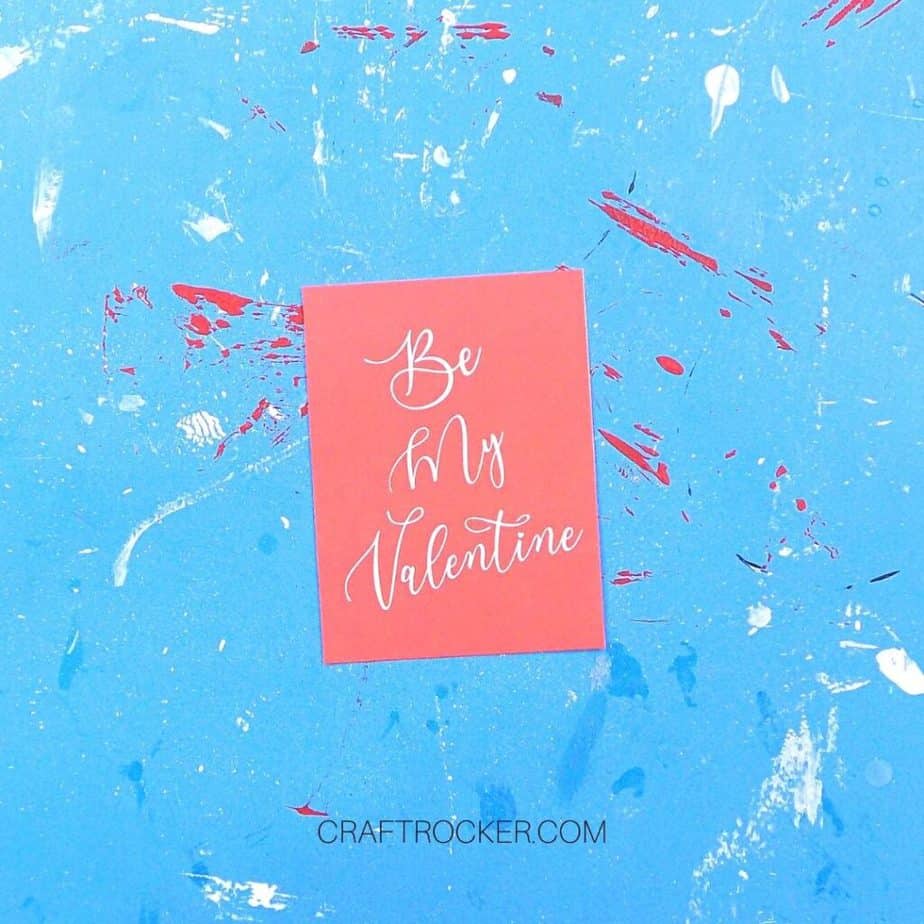
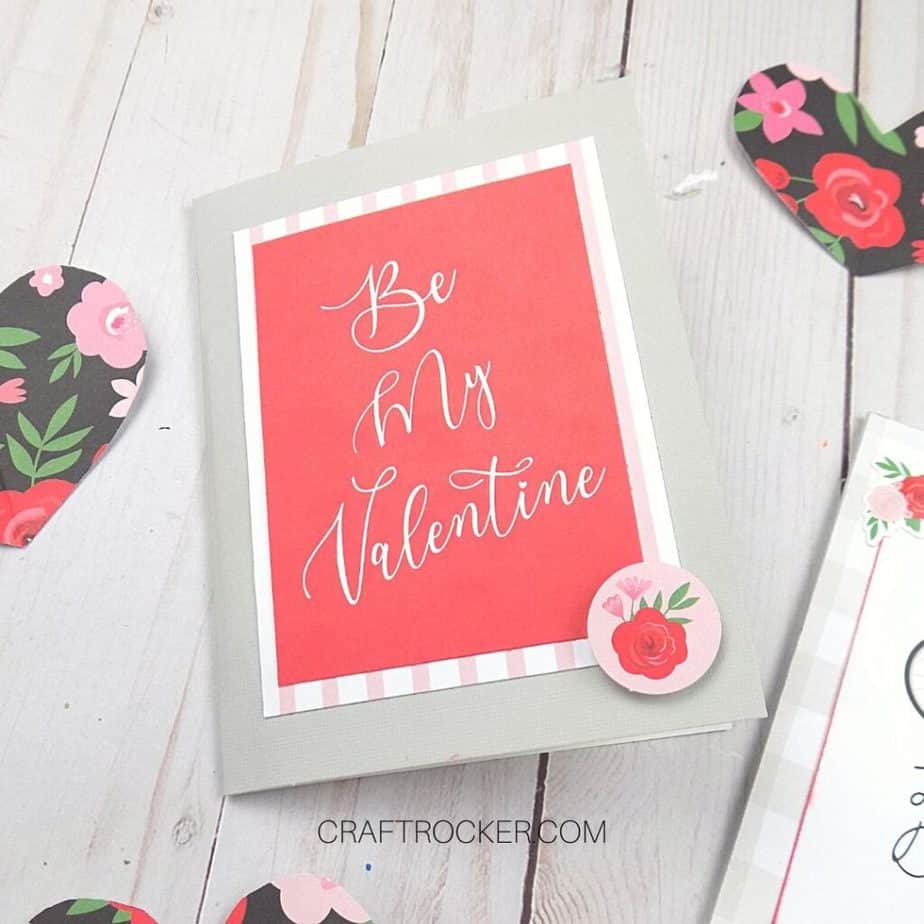
Next, cut out the “Be My Valentine” tag from your paper pack.
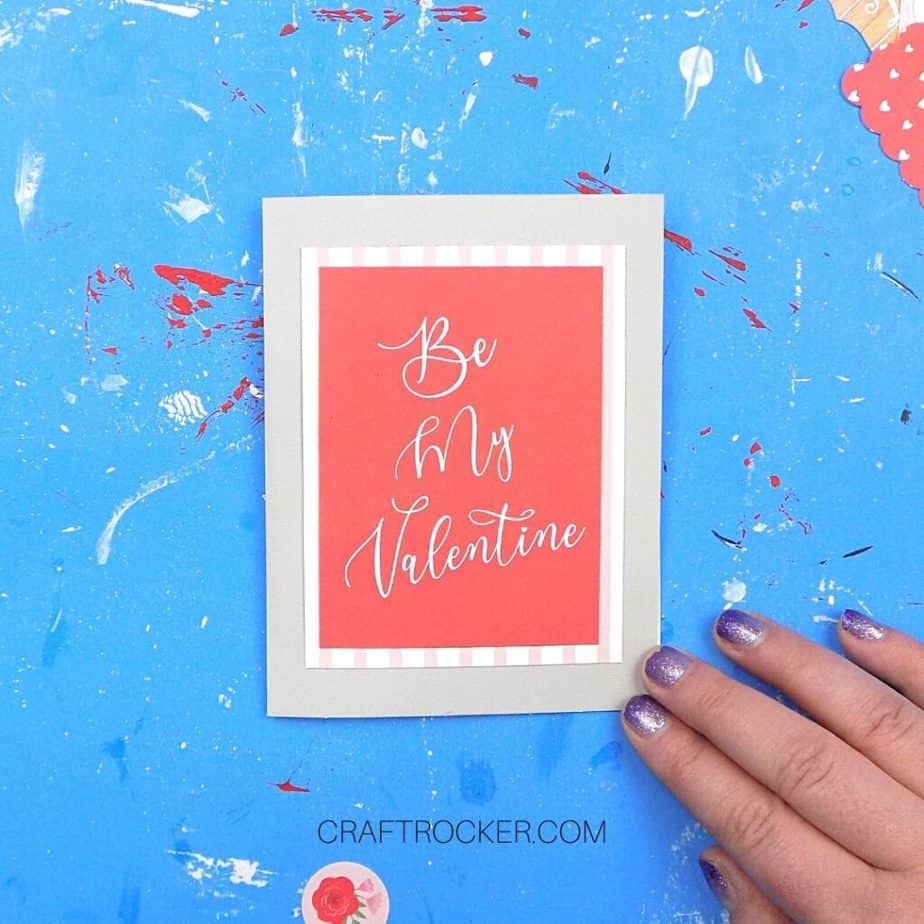
Step 10
Then mount the tag on the light pink and white striped paper in your paper pack.
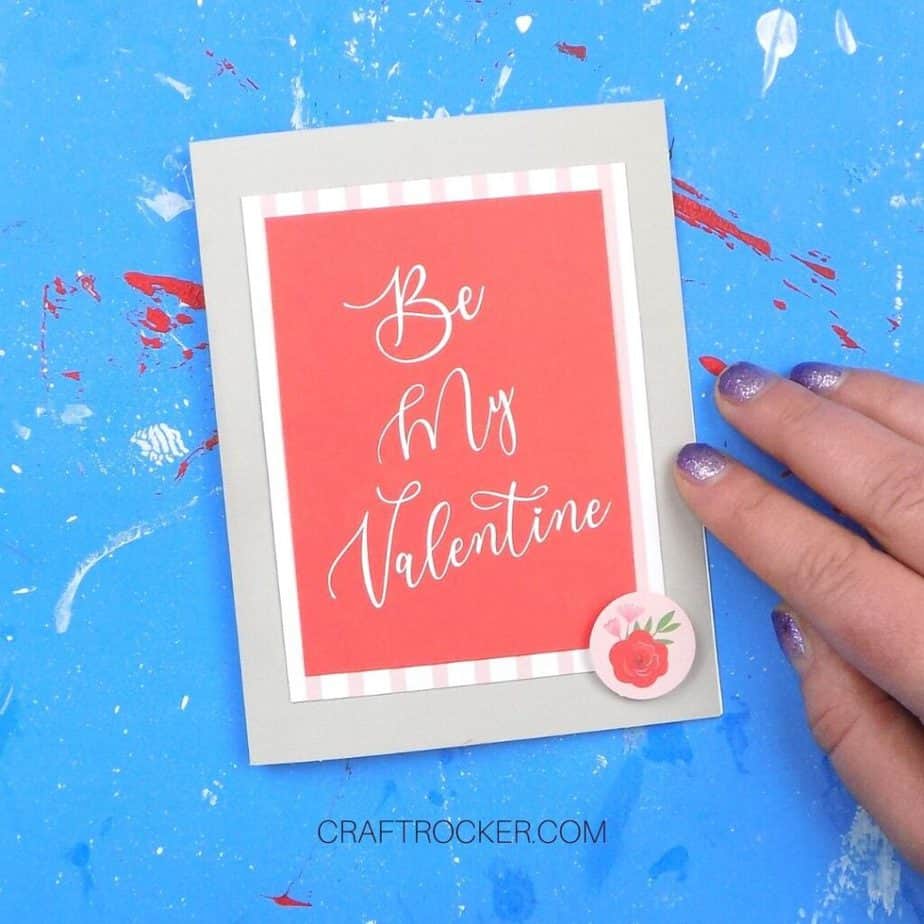
Step 11
Lastly, finish your card by attaching the the matted tag in the center of the front of your card.
Then attach the round floral embellishment use an adhesive foam square.
Tips and Tricks for Success
Once your hearts are attached to the cards in the tutorials above, you have technically made your pop up heart card. If you want to make the cards for a different occasion, it’s easy to change the front and inside embellishments of the cards.
Make sure that your ink is dry before attaching your chalked embellishment to the front of your card. Otherwise, the ink can smear.
If you need help with any of the terms used in this tutorial, like embellishment or mat, check out Scrapbooking Terms for Beginners to Know.
You can also use the first tutorial for a pop up card to easily make any themed pop up card. Simply change the heart embellishment out for whatever you want: a robot, flowers, and more.
Pop Up Card with Heart

Materials
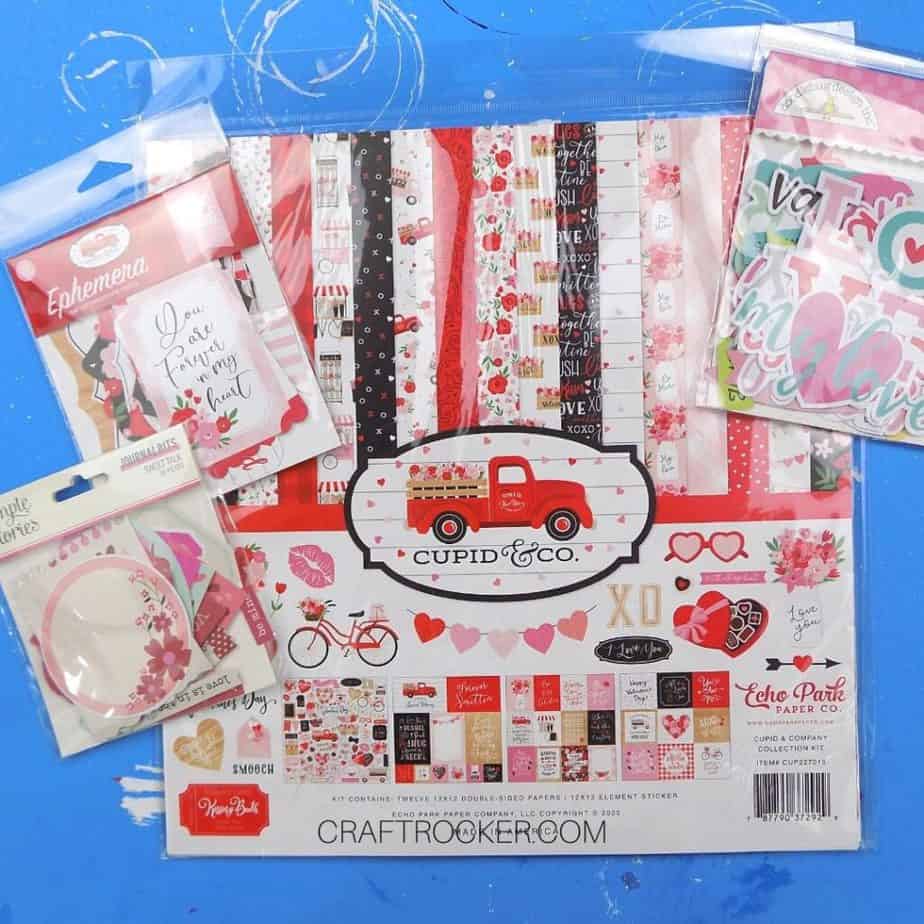
- Echo Park Cupid & Co. Valentine Paper Set
- Matching Cupid & Co. Ephemera Embellishments
- Greeting Card Blank
- Ruler
- Scissors
- Red Pigment Ink
- Corner Rounder Punch
- Pink Ribbon
- Hole Punch
- Glue Runner
- Adhesive Foam Squares
Instructions
- First, cut 2 parallel slits in the middle of the folded edge that are 1/2 an inch apart and 1.5 inches deep. See the picture for reference.
- Next, open your card and pop the cut section out on the inside and fold the card to create creases in the cut section. This makes it so that the pop out is on the inside of the card.
- After your pop-up section is ready, pull out the “Be Mine” floral heart element from your embellishments. Add a small strip of glue to the left side of the fold on the pop-up section. Then press your floral heart element into the glue.
- Make sure that the floral heart is centered when the card is open.
- Next, cut out 2 pieces of the gray buffalo plaid paper that are the same height and width of your card front.
- Then use your glue runner to attach one buffalo plaid piece to the front and the back of your greeting card.
- Make sure that you start by lining up the edge of the plaid piece with the folded edge of your card.
- Once your plaid pieces are attached, trim any excess that you can see from the inside of the card.
- Next pull out the tag sheet from your paper set that has the bicycle on it and says “Love is a Beautiful Ride”.
- Cut out that tag from the sheet then trim the long edges roughly 1/4 inch each so that it is smaller than the width of your card.
- After your tag is cut out and trimmed, round the corners with a corner rounding punch.
- Then chalk all around the edges of the tag with red pigment ink.
- Before attaching your chalked tag, find the “XOXO” embellishment from the Ephemera set.
- Then attach your chalked bicycle tag to the center of your card front with your glue runner.
- Lastly, attach the “XOXO” embellishment to the bottom, right corner of your card front with your adhesive foam squares.
- After the front of your card is finished, set it aside and cut a piece of pink ribbon that is roughly 6 inches long.
- Then find the L-O-V-E banner pieces from your Ephemera set.
- Next, punch 2 holes in the top of each banner piece with your hole punch.
- Once each piece has 2 holes, thread them onto you piece of ribbon by going in through the front of your banner piece on the first hole and coming up through the back on the second hole.
- Now attach the ends of your ribbon to the inside of your card with a small amount of glue from your glue runner. See the picture above for reference.
- After your ribbon is attached, trim the excess at the glued ends and then arrange your banner letters so that 2 are on the left of the open card and 2 are on the right.
- Finish your card by attaching a matching floral spray sticker from your paper set over the edge of each ribbon end.
- Trim any edges that overhang if necessary.
3D Heart Pop Up Card
Materials
- Echo Park Cupid & Co. Valentine Paper Set
- Matching Cupid & Co. Ephemera Embellishments
- Greeting Card Blank
- Ruler
- Scissors
- Pencil
- Glue Runner
- Adhesive Foam Squares
Instructions
- First, cut out 3 squares that are roughly 6 inches from the “Be Mine” jar paper.
- After your squares are cut, fold each square in half. Then cut a heart from one of your squares.
- Next use the first cut out heart as a template for your remaining 2 hearts.
- It’s important that the hearts are the same size for a clean 3D heart.
- After you have traced your heart onto the second 2 folded papers, cut out each heart.
- Once all of your hearts are cut out, use your glue runner to attach them together.
- To do this, glue the right half of the first heart to the left half of the second heart.
- Then glue the right half of the second heart to the left half of the 3rd heart.
- Make sure that you attach the polka dotted sides so that the floral sides are what is shown.
- Next, add adhesive from your glue runner to the far right side of your 3D heart and attach it just slightly to the right of the inside center fold of your card.
- Then add adhesive to the left side of your 3D heart and carefully fold your card and press firmly so that your heart attaches to the inside of the card.
- After your 3D heart is attached, open your card again and attach the rectangular “Always & Forever” banner embellishment from the Ephemera pack to the bottom right hand side of the inside of your card.
- Next, cut out the “Be My Valentine” tag from your paper pack.
- Then mount the tag on the light pink and white striped paper in your paper pack.
- Lastly, finish your card by attaching the the matted tag in the center of the front of your card.
- Then attach the round floral embellishment use an adhesive foam square.
Once you have the basics of how to make a pop up heart card they can easily be customized for other occasions.
You can also make them as they are for a beautiful and easy Valentine’s Day card for the one you love this year.
Don’t Forget to Pin It!
More Valentine Crafts
Colorful Valentine Heart Decor
Red Pickup Truck Valentine Box
Polka Dot Heart Burlap Wreath – Cookies, Coffee, and Crafts

Leave a Reply